Sunday, July 6, 2014

Get Free Facebook Likes, Google+ Followers

1:29 PM Unknown
Get Free Facebook Likes and Google + Followers
Get Free Facebook Likes and Google + Followers

Get Free Facebook Likes and Google+ Followers Youtube Views and More

Get Free Facebook Likes, Follows, Shares, Google + , Youtube Views Subscribes , Pinterest , Instagram Followers and more. 

Join the Race

Note:  Use UK/US as country while signing up.
  • Now visit here to apply coupons [ http://goo.gl/jqT8Uk ] .
  • Use the following coupons to get 7500 extra coins. 
  • 3752-4113-6084-6273 [ 1000 Coins ]
Free Facebook Likes

  • 7327-4782-5767-5651 [ 6500 Coins ]
Free Facebook Likes

  •  As of now you have 7800 coins. So, add your Facebook Fan Page , Youtube Page or any social page you want to boost. 
  • Go to Home page and > Add Your Page.

Earn More Coins


  • To earn more coins to you can other users page and profiles. [ Note : Don't use your original Facebook ID to like pages and subscribe to earn coins, make a fake ID and use that. ] 


How to share Files over Wifi AdHoc in Windows 8

12:03 PM Unknown
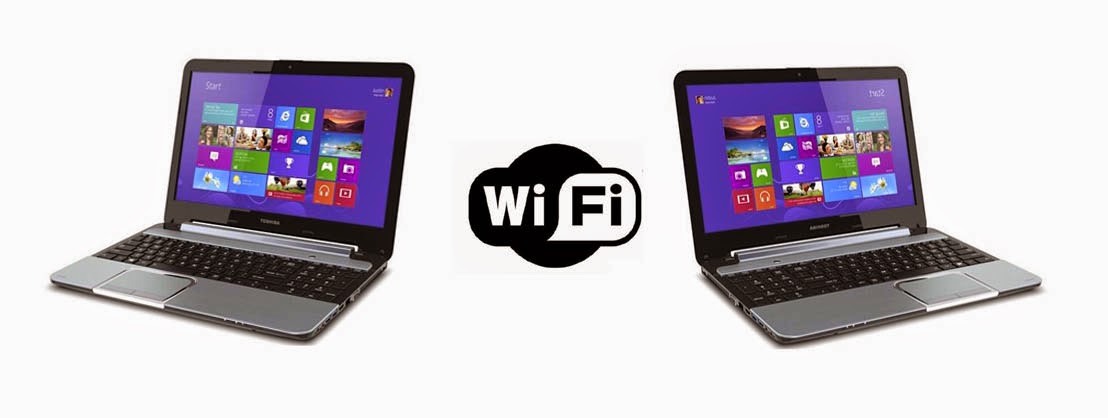
Share Files Over Wifi Windows 8

How to Share Files Using Wifi Windows 8

To send and receive files from one Laptop to another Laptop running windows 8 you need to configure both Laptops. Before starting make sure both Laptops supports Wifi and drivers are installed properly. 

Laptop 1 [ Host/ Sender ]

  • Turn On Wifi and create AdHoc Network [ You can create AdHoc network using command line or simply can use small utility Simple Adhoc Creator to create AdHoc Network. ]
Simple AdHoc Creator Windows 8
  • Run Simple AdHoc Creator put the Username and Password for AdHoc network and Start.
  • Now Open My Computer and share folders containing the data you want to share.
  • Select Folder > Options > Share With > Specific People.
  • Now from Dropdown list select Everyone and Share.

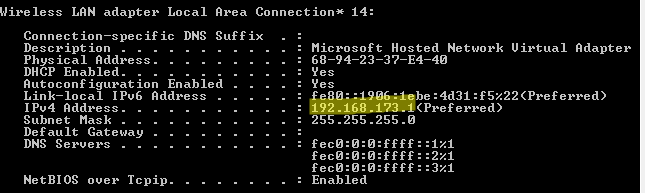
  •  Now find the IP of your system. So, that second Laptop can connect to you to find your shared files.
  • Open CMD [  Windows + X ] and type [ Ipconfig/all ]
Find Wifi Adapter IP Address
  • Now its all done from Client Laptop and Move forward to Boot second Laptop.

Laptop 2  [ Receiver ]


  • Boot Laptop > Turn On Wifi and Crete to the AdHoc visible under Wifi Networks .
Open Files Shared over AdHoc
  • Now open Run [ Windows + X ] and type [ \\ Client Wifi IP eg:  \\192.168.173.158 ] and Now all shared files from client Laptop opens up and Just copy them to your drive. 


Thursday, July 3, 2014

What are GOIP GSM Gateways | Price and Buy GOIP GSM Gateways

7:53 PM Unknown

GOIP GSM Gateways

What are GOIP GSM Gateways ?

GOIP GSM Gateways are devices that are used to bridge IP Networks and GSM by enabling Voice communications over them . Its installed on a GSM Mobile SIM Card and you can register the GSM telephone on the VoIP Softswitch. it can be easily combined into arbitrary number of channels of Large Gateway Group. Low price, perfect sound quality and powerful function make GoIP GSM inevitable choice of system Integrators, traffic Business and soft switch Manufacturers.


Features of GOIP Gatways 

  • Support dual protocols: ITU-H.323 V4 and IETF SIP V2.
  • GSM module for making GSM calls.
  • Provide 4/ 8/ 16/ 32 Sim Card ports for GSM extensions.
  • Support Multiple dial plans and line hunt.
  • Support QoS, NAT transversal and router function.
  • Support G.711 A/μ law, G.729A/B, G.723.1 Codecs.
  • Support VAD, CNG, EC.

Price of GOIP GSM Gateways 

GOIP Gateways are a bit costly and will cost from $100 - $ 600 [ Rs 5000 - Rs 30000]  depending on number of SIM slots available and technology available .


Buy GOIP GSM Gateways


Tuesday, July 1, 2014

Creating OpenVpn configuration files with Astrill Vpn

9:11 AM Unknown
So, Now after getting your Premium Astrill account for 6 months we are going to create openvpn configuration files. 

If you don't have Astrill Account check out [ http://www.iterative.info/2014/07/free-astrill-vpn-account.html ]


Astrill VPN logo

OpenVPN Configuration files for Astrill VPN


  • Login to your Astrill Account Dashboard and select VPN SERVICES .
  • Now select OpenVPN Certificates
Astrill OpenVPN Certificates
  • Now under description area Add a new name to create certificate and Press "Add to My Certificates " .
Astrill Create OpenVPN Certificates
  • Now click the name below to get your OpenVPN configuration files
OpenVPN configuration Files Astrill VPN


Free Astrill VPN Account Key for 6 Months

9:02 AM Unknown
Astrill VPN Logo

Astrill VPN , No doubt one of the best VPN service provider available today with of innovative features. 

  • Defeat ISP deep packet inspection.
  • Prevent Geo-targeting and location identification.

Astrill has 160 servers in 49 countries .

GET ASTRILL VPN FREE ACCOUNT FOR 6 MONTHS


  • Visit the link to sign-up for the 6 month package [ 39$ ] [ http://goo.gl/KrLPft ]
  • Now Enter the Coupon Code :
  •  AS180-20C29-8PEHU-46GHN
  • Fill the details required in the next step to complete registration .
Astrill VPN 6 Month Premium Account


Wednesday, June 25, 2014

How to book Domains with Google Domains

10:35 AM Unknown
How to Book  Domains with Google Domains 
Google the search giant has finally started registrar service, the service to book domains. Currently  the service is in Beta Mode and is open for Invite Only service. 

  • Features of Google Domains.

Here are the bunch of exciting features comparable to  #GoDaddy and #Bigrock coming with the domain package from Google. 

#No additional cost for private registration,  #Easy integration with top website builders and many more.  Checkout the complete list here [ https://domains.google.com/about/features.html ]

  • Requesting an Invitation.


The service is now unavailable for open use and require Invitation for usage . Requesting an invitation is easy and you can easily get your invitation by filling a short form [ http://goo.gl/dS7MmV ]

  • Pricing 

The pricing for domains is still unknown and we will try to update it as soon we got any updates. 


Top Android Applications for FREE CALLS without Internet

10:10 AM Unknown
Android FREE CALL Applications 2014

Android FREE CALL Applications

Android No doubt the most popular operating system in the world with hundred of thousand interactive useful applications and tools. In this article we are going to show you some useful applications to make FREE CALLS Without using VOIP i.e direct Mobile to Mobile calls using applications.

  • CFC Application

This is a sponsored service and you need to earn few points by completing short surveys in order to get points required to make unlimited Free Calls and send unlimited texts.

  • Dingaling

Dingaling supports peer-to-peer voice calls over 3G / 4G and its totally FREE. You just need to install the application to make calls.

  • Free Kall 

Free Call is an innovative method of calling and it dosen't require any application. You just need to dial an toll Free number [ Can be found here www.freekall.in ] and provide your destination number on receiving call back .

Its an Ad supported service and you might listen few short Ads in between while your call is going on.

  • Libon

Call more than 90+ countries with Libon totally FREE. Apart from FREE CALLS Libon also supports Instant Messages, Chat etc.

  • Voxox


Make 60 Minutes of FREE Calling with VOX supporting over 90+ countires. 



Tuesday, June 10, 2014

Solve XAMPP error Port 80 or 443 already in use

8:41 PM Unknown
XAMPP the most common package which builds WAMP server on Windows. XAMPP contains Apache, PHP, MySQL, Tomcat, FileZilla and Mercury packages. 


Although, one major problem came across XAMPP user [ Port 80 or 443 already in use ] and we are going to find the solution to the problem. 

Reason behind the Problem  [ Port 80 or 443 already in use ]


  • The main reason behind the problem is that some system application is already running on the port 80 and thus apache is not able to configure the port.
  • All applications such as MySQL, Tomcat will work flawlessly and only APACHE need to be reconfigured to work.

How to solve  Port 80 or 443 already in use problem.

  • Open XAMPP Control Panel and Click on Config at right corner in front of APACHE. 
  • Open [ Apache ( httpd.conf) ] from the drop down list of configs.
Open Apache config file 
  • Now click ctrl+f to search in the file and search for [ Listen ] and change [ LISTEN 80 to LISTEN 1080 ]
xampp httpd.conf file port configure
  • Now Save file and start Apache again .
  • Access your files via url [ localhost:1080/foldername/filename ] located at htdocs in C.


Monday, April 28, 2014

18K Skype Premium Account Vouchers 2014

11:22 AM Unknown
Skype is a Calling, seeing, messaging and sharing application owned by Microsoft and available on almost all platforms from Windows to Android for Mobiles, PC's and Tablets. 
Skype logo 

What You can do with Skype ?

  • Video and voice calls to anyone else on Skype.
  • Instant messaging and file sharing.

With Skype Premium ?

  • Calls to mobiles and landlines worldwide at low rates.
  • Send text messages from just a few pennies.
  • Group video calls with up to 10 people, and many more stuffs.

How to Apply Coupon ?


Skype Premium Vouchers 2014
  • Now Click on Redeem to Redeem the Voucher. 
Skype Premium Account Voucher Codes 2014

Where are Skype Premium Vouchers


Sunday, April 27, 2014

Redirect traffic from Blogger to other sites.

10:41 AM Unknown
You are here that means you must be familier with Blogger and its working. There may be many reasons of redirecting traffic coming to a blogger to Blog to any other site or blog. Although, we are not going to discuss them . 
Blogger Logo Windows 8 style

How to redirect Blogger traffic to any other site ?


  • Go to Blogger and Login to your Dashboard. 
  • Select the Blog you want to redirect and Click on Template and Edit HTML . [ Dashboard > Select Blog > Template > Edit HTML ].
  • Now click [ ctrl+f ]and type <head>
  • Now under head tag type [ <meta http-equiv="refresh" content="0;url=http://iterative.info"/> ] replace iterative.info with your own address. 
Blogger Page redirection

  • Now Save Template to make the changes permanent . 


Check authenticity of any Paypal account

10:28 AM Unknown
Paypal is the wolrd most used platform to transfer and receive money online. Its used worldwide for making payments, shopping and more. 

Paypal Logo

How to check Weather Paypal ID is verified or Not ?

  • Login to your Paypal ID .
  • Now copy the link [ https://www.paypal.com/verified/pal=email-id-to-check ] and paste in the address bar of the browser.
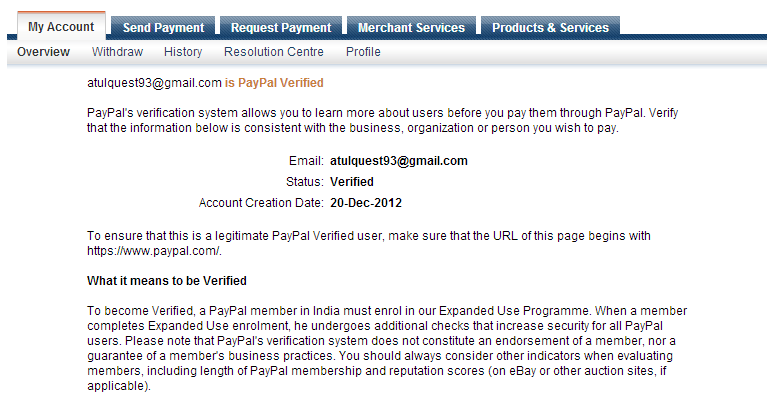
  • Example : To check authenticity of account atulquest93@gmail.com open https://www.paypal.com/verified/pal=atulquest93@gmail.com in the browser. 
  • Now a Paypal page will open showing you the details of the provided Paypal account.
Paypal Verification Statement

Keep in Mind .


  • You must be logged-in to your paypal account while checking for others. If not, you will receive an error page requesting you to Log In.


Use your Gmail ID to verify unlimited acounts

10:00 AM Unknown


No doubt, Gmail is one of the biggest MAIL service provider and millions of people rely on Gmail. On daily basis we signup for number of services and uses gmail to verify account. 

Gmail Logo

So, here is a method to verify unlimited accounts on any site [ even on Facebook ] using Gmail alias feature


What is GMAIL alias feature ?

  • As Gmail doesn't offer traditional aliases, but one can receive messages sent to your.username+any.alias@gmail.com to its mail id your.username@gmail.com
  • Ie. Messages sent to atulquest93+notes@gmail.com are delivered to atulquest93@gmail.com.
  • Now similarly you can use any alias to verify unlimited accounts using same gmail account.

Offical Statement .


You can read the official statement for Alias at https://support.google.com/mail/answer/12096?hl=en


Sunday, April 20, 2014

Freecharge.in Offer | Pay Rs60 and Get Recharges worth Rs170

8:28 PM Unknown
Most of us must be knowing about Freecharge.in  [ Its a trusted site to recharge Mobile, Pay Bills, and more ] . As they come up with great offers for their customers every-time and following the trend again Freecharge as bought a great Coupon and Cashback Combo using which you can recharge your mobile with amount of Rs70 by just paying Rs20
Or Just Pay Rs60 and get Recharges of Rs 170

Pay Rs 100 and Get recharges Worth Rs 250

Steps to Follow.

  • Visit Freecharge.in and Register [If your don't have account] or Login [ If you already have account ].
  • Now Select "Recharge your Prepaid Mobile" and Fill the details. [ Fill Rs60 as amount OR Fill Rs20 as amount  ] and fill other details and PROCEED TO COUPONS.

Select FREECHARGE Rs20 Coupon
  • Now Select "FREECHARGE RS20 COUPON" Its free and for amount of 20 you can select max of 2 Coupons (i.e RC of amount 40) and for 60 you can select maximum of 4 coupons (i.e RC of amount 80).
  • Now PROCEED and again apply COUPON : LOOTLO [ This coupon will give you 50% cashback as Credits instantly after payment].
Freecharge 50% off coupon April 2014
  • Now pay the amount by Debit/ Credit Card and You will get 50% cashback of amount as freecharge credits instantly .

Important Notes: 

  1. Coupons will get delivered to Your Email ID.
  2. You will get 50% cashback as Credits which can be used later for recharges.
Freecharge Coupons April 2014

Total Profit and Recharges :


  • Recharge of 60 [ Which you need to pay ]. [ +Rs60] [ -Rs60]
  • 4 Coupons worth Rs 20 Each [ i.e +Rs80 ]
  • Rs 30 Cashback [ +Rs30
  • Total = [ Rs60+Rs80+Rs30-Rs60] , Net profit : 110Rs .
  • Total recharges done : Rs60+Rs80+Rs30 = Rs 170.
Similarly , Rs 20 users can  get Benefit of Rs 70 and Rs 100 Users can get benefit of Rs 230.


Monday, February 3, 2014

Make your Usb Drive Write Protected to protect from viruses

10:47 PM Unknown
Their may be a number of reasons to make your USB Drive read only. In read only mode , user can only read and copy the data stored on the disk but, can't write or delete any data from the USB Drive. This is quite useful when you are going to copy some data to a system containing lot of viruses. However, there may be a number of reasons a user want to make its USB read only or Write Protected.
Write Protect USB Disk
How to mae your USB Write Protected.
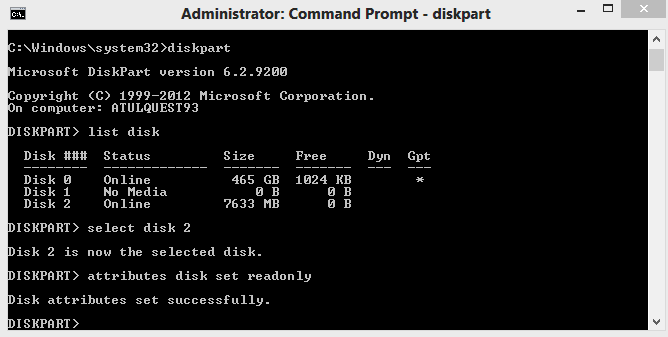
  • Open CMD , and Type diskpart or Simply type diskpart in RUN. DiskPart utility will get started.
  • Now type "list disk" to get all disks listed. Here Disk ### is the disk number and we will use it to uniquely select the disks.
  • Now type "select disk ##" to select the disk to write protect. ## is the disk number. Eg type "select disk 2" for selecting disk number 2.
Windows DiskPart Utility
  • To Write protect the selected drive type "attributes disk set readonly" and hit Enter. Now your device is Write protected.
Write Protect USB Drive
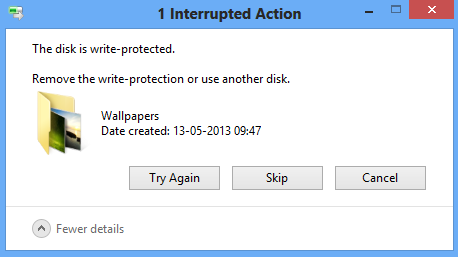
  • Try to copy something into the drive , and you will get Write Protected Error message. 
Disk is Write Protected

Remove Write Protection from Disk

  • To remove Write Protection from disk type "attributes disk clear readonly" and hit Enter.


Install Android x86 on Virtual Machine

9:52 PM Unknown
Android is no doubt the most widely used operating system for mobile. With a great user base , their are a number of Android application developers developing applications fro Android. While developing applications is becomes quite hectic to build an application and test it after installing on Mobile and for every succeeding build you have to do the same. So, Here is a method to test the applications on your system without installing them in your mobile on ANDROID installed in your Virtual Machine.
Install Android x86 on Virtual Machine Vmware Player

Requirements to Install Android x86

How to Set Up Android x86 on Virtual Machine

  • After the pre-setup , Launch Vmware player and Select New Virtual Machine, Browse and Select "Android-x86.iso" file and Finish the setup following instructions. 
After completing Adding New Virtual Machine Launch Android from your Virtual Machines list.
  • Now from the Menu select "Installation- Install Android x86 to disk" and Hit Enter.
Android x86 Live & Installation Menu
  • After few seconds a Partition wizard will get open , Select " Create / Modify Partitions"  and use Arrow keys and Enter Key to Browse and Select Options.
Create Partition Wizard
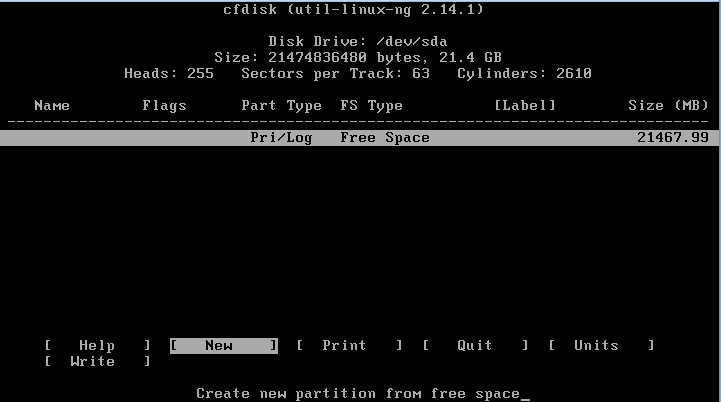
  • Hit NEW to create a new partition, select PRIMARY and provide the disk size you need.
Create New Primary Partition
  • Now select Partition and Hit BOOTABLE to make the partition create primary to boot the OS.
  • Now select the Partition and Hit WRITE to install the OS to selected partition. Now Press ESC and QUIT to main Partiton Window.
Write Allocation Table to Partition
  • Now select the Partition and Select Format using NTFS and Follow the instructions until setup got completed. Hit Yes whenever its required.
Select Partition to Install Android x86
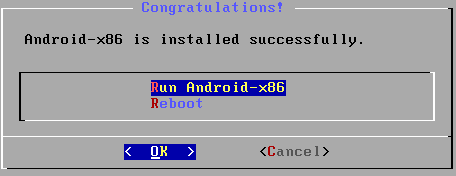
  • It will take near about 4-5 minutes to get installed completely. After getting the Installation Successful message, Select Run Android -x86.
Android Installation Successful
Android Installation Successful 
  •  Now Android will get started in Vmware player, Configure it the same as you configure your Android Device .[ Select Country, Provide Gmail Details etc ].
  • After finishing the Setup Android is ready to use on Virtual Machine.


Sunday, February 2, 2014

How to set-up your own DNS Tunneling Server

8:08 PM Unknown
Setting Up your Own DNS Tunneling Server and Tunnel Network over DNS using our own created server . As the method is quite long have patience and follow the steps carefully or Alternatively, you can use an easier approach using Your-Freedom Client
Create your own DNS Tunneling Server

Requirements 

  • A VPS [ Virtual Private Server ] with tun/tap support.
  • Free time and Lot of patience. 

Settings up DNS to resolve Queries

  • Register a free account at freedns.org  , and Verify your account.Now , Login to the account and go to Sub-Domains
  • Under Sub-Domains click on ADD and Fill the required details .
    • Select TYPE as NS.
    • For Sub-domain field enter any name[ eg. iterative]. 
    • Select any Domain from available list for domain field.
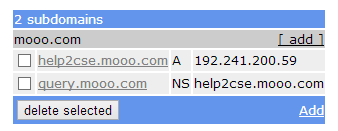
    • Similarly for Destination, enter any name and append your domain with it. [ Suppose your sub-domain-name is iterative  and domain is mooo.com, then enter iterative.mooo.com as Destination.] and Save.
Setting up DNS Server
  • Add another record for sub-domain with the following details .
    • Select TYPE as A.
    • Enter your Sub-Domain, in the Sub-Domain field .[ eg iterative for example, defined earlier ].
    • Select older Domain for the Domain field [ mooo.com in our case ].
    • Now in Destination, Enter your VPS IP and Save.
Setting up DNS, Type A
  • Now our DNS setup is ready to resolve queries. 
DNS records Configured

Server Setup [ Ubuntu ]

To setup our Tunneling server we are going to use Iodine Daemon , and before proceeding make sure you are login as root user and VPS have tun/tap capabilities
  • Login to Terminal of your VPS.  If you don't know how to Login to Terminal, Read your guide on using Linux VPS.
  • Now type the following command to install iodine on your VPS.
    • apt-get install iodine [ For Debian and Ubuntu users ].
    • yum install iodine [ For CentOS users ].
After executing the following commands Iodine got installed on your VPS. Now we need to start iodine so that it start listening for incoming connections. By default Iodine listens on Port 53 [DNS].
  • Now type the following command to start Iodine "iodined -f Privae IP -P Password subdomain.domain". I.e for our case query will be [ iodined -f 10.0.0.1 -P iterative query.moo.com ]
    • Append -f to run the service in Fore-ground.  If -f is not included Iodine will get terminated as soon you close terminal.
    • Always use private IP stack for the server . [ Eg : We have selected 10.0.0.1 , You can also use 198.168.0.0 , 172.0.0.1 etc ]
    • iterative is the password for our case. You can use your own password.
    • query.moo.com is our domain name. Check III snapshot in DNS setup corner.
Iodine Started on Server
  • Now your VPS is ready to listen and We will now proceed to setting up Iodine client on windows.

Check Your Server Setup

Vists http://code.kryo.se/iodine/check-it/ and enter your Domain name [ query.mooo.com in our case ] to check the Iodine configuration . The site will check and return whether your server is properly configured or not. 
Iodine Configuration Successful
Iodine Configuration Successful 

Setting Up Client to use DNS Tunneling.

  • Download and Extract Iodine from http://code.kryo.se/iodine/ to C Drive [Win 32 Libraries].
  • Now open CMD and go to Directory where you had extracted the Iodine. [ cd C:\iodine\bin ]
  • Now run the following command to start Iodine [ iodine -f -P iterative query.mooo.com ].
Iodine Client Running

Frequent Problems.

  • Make sure Tap adapter is installed on your system . If not visit openvpn downloads and install TAP adapter.
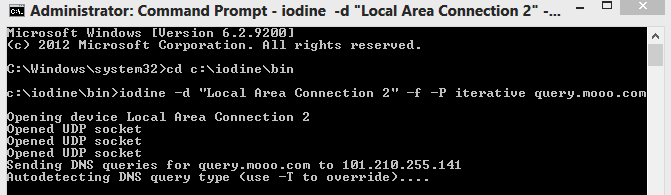
  • If more than 1 adapters are installed on your system. Append -d "adapter name" to the string while starting iodine. [ iodine -d "Local Area Connection 2" -f -P iterative query.mooo.com ] . Here, Local Area Connection 2 is adapter name. 
  • To check available adapters on the system Type ncpa.cpl on run

Still Facing Problems.

If you still facing any problem while setting up server and connecting to server. Leave a comment with the problem description and we will try to solve it as soon as possible. 


Olympus E M10 Changing definition of Compact DSLR Cameras

7:08 PM Unknown
There is fierce competition in the world of compact-interchangeable lens cameras. Olympus just came up with a new device into the fray: the OM-D-E-M1O, on update to popular E-M5 that add some exciting features with reducing size and weight . More Pro-oriented E-M10 incorporates all the features and body type of E-M5 and that too at lower prices. 
Olympus E M10 Super Charged
Olympus E M10 Super Charged 

What's New ?

A new Image processor is present to reduce noise along with 16 Mega-pixel micro-four-thirds sensor. Even the Auto-Focus is the company's fastest ever and the manual focuses are there that focus peaking and highlights the in-focus areas.

User can also enjoy Wifi built in this E-M10, simply meaning camera can be sync with Olympus powerful smart-phone and tablet applications. This is pretty easy task and can be used to take selfies, time-lapses or just fire a shot from around the corner .

The size of the Camera is comparable to the svelte E-M5 ; and it now homes an improved electronic view finder and pop-up flash. 

Price

It is a great option for anyone who aspires to buy the Olympus system these last few years. Though there is a amiable competition from Panasonic , Canon and FujiFilm. 

This new model will soon be available  for $700 for the body only and $800 for kit 14-42 mm Zoom lens.