Showing posts with label VPS. Show all posts

Tuesday, June 10, 2014

Solve XAMPP error Port 80 or 443 already in use

8:41 PM Unknown
XAMPP the most common package which builds WAMP server on Windows. XAMPP contains Apache, PHP, MySQL, Tomcat, FileZilla and Mercury packages. 


Although, one major problem came across XAMPP user [ Port 80 or 443 already in use ] and we are going to find the solution to the problem. 

Reason behind the Problem  [ Port 80 or 443 already in use ]


  • The main reason behind the problem is that some system application is already running on the port 80 and thus apache is not able to configure the port.
  • All applications such as MySQL, Tomcat will work flawlessly and only APACHE need to be reconfigured to work.

How to solve  Port 80 or 443 already in use problem.

  • Open XAMPP Control Panel and Click on Config at right corner in front of APACHE. 
  • Open [ Apache ( httpd.conf) ] from the drop down list of configs.
Open Apache config file 
  • Now click ctrl+f to search in the file and search for [ Listen ] and change [ LISTEN 80 to LISTEN 1080 ]
xampp httpd.conf file port configure
  • Now Save file and start Apache again .
  • Access your files via url [ localhost:1080/foldername/filename ] located at htdocs in C.


Sunday, February 2, 2014

How to set-up your own DNS Tunneling Server

8:08 PM Unknown
Setting Up your Own DNS Tunneling Server and Tunnel Network over DNS using our own created server . As the method is quite long have patience and follow the steps carefully or Alternatively, you can use an easier approach using Your-Freedom Client
Create your own DNS Tunneling Server

Requirements 

  • A VPS [ Virtual Private Server ] with tun/tap support.
  • Free time and Lot of patience. 

Settings up DNS to resolve Queries

  • Register a free account at freedns.org  , and Verify your account.Now , Login to the account and go to Sub-Domains
  • Under Sub-Domains click on ADD and Fill the required details .
    • Select TYPE as NS.
    • For Sub-domain field enter any name[ eg. iterative]. 
    • Select any Domain from available list for domain field.
    • Similarly for Destination, enter any name and append your domain with it. [ Suppose your sub-domain-name is iterative  and domain is mooo.com, then enter iterative.mooo.com as Destination.] and Save.
Setting up DNS Server
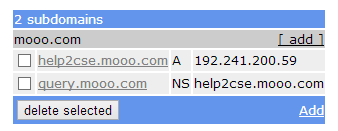
  • Add another record for sub-domain with the following details .
    • Select TYPE as A.
    • Enter your Sub-Domain, in the Sub-Domain field .[ eg iterative for example, defined earlier ].
    • Select older Domain for the Domain field [ mooo.com in our case ].
    • Now in Destination, Enter your VPS IP and Save.
Setting up DNS, Type A
  • Now our DNS setup is ready to resolve queries. 
DNS records Configured

Server Setup [ Ubuntu ]

To setup our Tunneling server we are going to use Iodine Daemon , and before proceeding make sure you are login as root user and VPS have tun/tap capabilities
  • Login to Terminal of your VPS.  If you don't know how to Login to Terminal, Read your guide on using Linux VPS.
  • Now type the following command to install iodine on your VPS.
    • apt-get install iodine [ For Debian and Ubuntu users ].
    • yum install iodine [ For CentOS users ].
After executing the following commands Iodine got installed on your VPS. Now we need to start iodine so that it start listening for incoming connections. By default Iodine listens on Port 53 [DNS].
  • Now type the following command to start Iodine "iodined -f Privae IP -P Password subdomain.domain". I.e for our case query will be [ iodined -f 10.0.0.1 -P iterative query.moo.com ]
    • Append -f to run the service in Fore-ground.  If -f is not included Iodine will get terminated as soon you close terminal.
    • Always use private IP stack for the server . [ Eg : We have selected 10.0.0.1 , You can also use 198.168.0.0 , 172.0.0.1 etc ]
    • iterative is the password for our case. You can use your own password.
    • query.moo.com is our domain name. Check III snapshot in DNS setup corner.
Iodine Started on Server
  • Now your VPS is ready to listen and We will now proceed to setting up Iodine client on windows.

Check Your Server Setup

Vists http://code.kryo.se/iodine/check-it/ and enter your Domain name [ query.mooo.com in our case ] to check the Iodine configuration . The site will check and return whether your server is properly configured or not. 
Iodine Configuration Successful
Iodine Configuration Successful 

Setting Up Client to use DNS Tunneling.

  • Download and Extract Iodine from http://code.kryo.se/iodine/ to C Drive [Win 32 Libraries].
  • Now open CMD and go to Directory where you had extracted the Iodine. [ cd C:\iodine\bin ]
  • Now run the following command to start Iodine [ iodine -f -P iterative query.mooo.com ].
Iodine Client Running

Frequent Problems.

  • Make sure Tap adapter is installed on your system . If not visit openvpn downloads and install TAP adapter.
  • If more than 1 adapters are installed on your system. Append -d "adapter name" to the string while starting iodine. [ iodine -d "Local Area Connection 2" -f -P iterative query.mooo.com ] . Here, Local Area Connection 2 is adapter name. 
  • To check available adapters on the system Type ncpa.cpl on run

Still Facing Problems.

If you still facing any problem while setting up server and connecting to server. Leave a comment with the problem description and we will try to solve it as soon as possible. 


Friday, January 3, 2014

Setting UP VSFTPD on Ubuntu VPS and Machine

9:32 PM Unknown


Setting up VSFTPD [ Very Secure FTP Daemon ] on Ubuntu based VPS and Machine. 


As FTP [ File Transfer Protocol ] used to transfer files is inherently insecure and vulnerable to a number of exploits . So, its preferable to use VSFTPD [ Very Secure FTP Daemon ] as alternative to FTP. It's more secure and have few enhanced features as comparedto FTP.

Setting UP VSFTPD on Ubuntu [ 12.0 ]

  • Open up terminal of machine or Vps and run the following command as root to install vsftpd.
sudo apt-get install vsftpd
  • vsftpd is already configured with default options. So, you can use it as it is and can play with settings to make is more secure.

Making vsftpd more Secure 

  • Open the vsftpd config file and make the following changes.
sudo nano /etc/vsftpd.conf
  • Or you can use 
sudo gedit /etc/vsftpd.conf
    • First, set anonymous mode off to restrict unidentified users from accessing the ftp server.
anonymous_enable=NO
    • Now uncomment local enable and and set it to Yes.
local_enable=YES
write_enable=YES
chroot_local_user=YES
  • Now save and exit from the vsftpd.conf file.
  • Create a separate directory to store ftp files and change the ownership of directory to root.
mkdir /home/username/files  [ To create directory ]
chown root:root /home/username [ To change ownership ]

  • Now Your VSFTPD server is securely setup. Now, restart vsftpd to activate the changes made.
sudo service vsftpd restart

Accessing ftp Server

  • Now, as we have installed and configured our vsftpd server. We , can use it to share files
  • Open your browser and type the address [ ftp://IP of VPS ] eg : [ ftp://192.168.0.1 ]
  • Or to access locally , you can use [ ftp 192.168.0.1 ] to access ftp service.


Thursday, January 2, 2014

Changing Access Privileges of Users to root on Ubuntu Machine / VPS

8:48 PM Unknown

Giving permanent Root Access to Users on Ubuntu Vps or Machine/ Changing Access privileges of user's to root. 


Using non-root account if you are using your machine/vps for limited number of tasks is always a better practice .Sometimes we need to run few commands with root access , although SUDO can be used their ,But as SUDO moniters, and logs the commands run Its better to escalate the privileges of you user account equal to root account.

Giving User account root privileges on Ubuntu VPS or Machine.

sudoers file ubuntu vps
  • The privilege information for each account on Ubuntu machine/vps was stored on a special sudoers file located at /usr/sbin
  • The sudoers file can't be directly modified. Hence, we need to use visudo command to edit it.
sudo /usr/sbin/visudo
  • Now scroll to the next line of " # user privilege specification " and add the following line after replacing the user-name with your user-name
user-name ALL =(ALL:ALL) ALL
  • Now press [ Ctrl + X ] and type [ Y ] to save.


Add and Delete Users on Linux VPS or Machine

8:31 PM Unknown


Add and Delete New Users on Ubuntu VPS or Ubuntu based Machine .


Most often we need to share our VPS with someone else , or sometimes we often need to Add New Users to our Ubuntu Machine or VPS to safeguard ourselves from system-destroying commands.

To perform root tasks the user need to have root access . But, if you are logged in with non-root access you can append sudo at beginning of the command to upgrade your privilege while running the command. 

SUDO itself is very useful command as :
    • It prevents user to execute system destroying commands.
    • All commands used with sudo appended get stored in the system and can be later reviewed if needed.
IF YOU NEED YOUR MACHINE OR VPS FOR BASIC LIMITED NUMBER OF TASKS . It's BETTER NOT TO USE ROOT ACCOUNT.

ADD New User to Ubuntu Machine or VPS

Add New User on Ubuntu
  • Open Terminal on Machine or on VPS .
  • Type the following command and change the new-user field with your desire user-name.
sudo adduser newuser
    • Now type and confirm your password.
    • File the further details required or just press Enter and the system will take default values for the field.
    • When asked press Y to save the information .
  • Now exit by typing EXIT and Login with the New User.

Delete users from Ubuntu Machine or VPS

  • To delete an user from Ubuntu machine or VPS , identify the user-name and tyoe the following command
sudo userdel user-name
  • Now if you want to remove user's home directory 
sudo rm -rf  /home/user-name


Thursday, November 28, 2013

Get Free Windows VPS | Windows 2008 2Gb Ram

6:26 PM Unknown


Hoping most of the users visiting page were already familier with VPS and aware of its applications and uses. Well, VPS is a Virtual Private Server, similar to our own PC with RAM, Hard-disk and Processor and used to carry out tasks on cloud.  So, here is a Free Windows trial for those who want to try VPS.

How to get Free Windows VPS.
  • Go to [ http://www.desktone.com/  ] and Click on Free Trial.
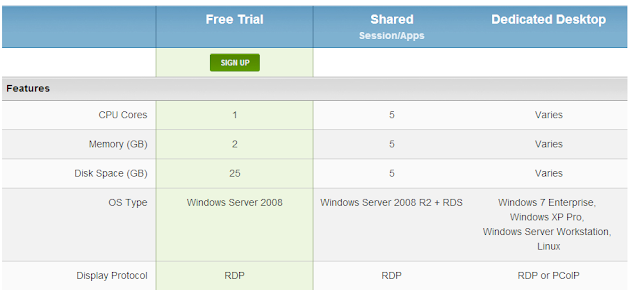
  • Basically it provide a VPS for evaluation of period of 7 days. With 2Gb RAM, 15GB Hdd, with Windows server 2008.
Windows VPS free Trial COnfiguration
  • Fill the registration form and the order details will get mailed to you . [ No Mail Verification required ]
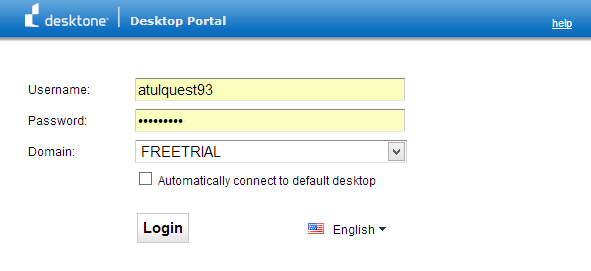
Login Cpannel
  • Now go to [ https://freetrial2.desktone.com/index.action ] and fill the username and password.
  • You will get redirected to control panel. Now click on desktop and a .rdp configuration file will get downloaded to your system .
Windows VPS applications Free Trial
  • Just run the .rdp file downloaded and within seconds your VPS is ready to launch . 


Thursday, November 21, 2013

Free OpenVPN VPN Service Providers

6:00 PM Unknown
VPN Logo

I Guess there is no need to give introduction regarding what is VPN , or How to use it . Hoping most of the users visiting the page are familiar with the VPN and alredy knows how to use it . I'm simply providing a list of FREE VPN PROVIDERS with OpenVPN support along with their restrictions and limitations.

Updated :Nov 2013

Vpnbook
Protocols supported: OepnVPN, PPTP
Expiry/Bandwidth Limit: NONE
Server Location: Europe, UK, US
Restrictions: Password changes every Week

PeoplesVpn
Protocols Supported: OpenVPN
Expiry / Bandwidth: NONE
Server Location: US
Restrictions : NONE

Vpngate
Protocols Supported:  OpenVPN
Expiry / Bandwidth : NONE
Server Location: WorldWide [ Volunteer Servers ]
Restrictions: NONE

FreeVPN.me
Protocols: OpenVpn, PPTP
Expiry/ Bandwidth: NONE
Server Location: US
Restrictions: NONE

Updated : Oct 2013

TunnelBear 
Protocol: OpenVPN
Expiry/Bandwidth Limit: NONE
VPN Server Location: US, UK
Restrictions: 500MB bandwidth per month
Website : https://www.tunnelbear.com/


TsunamiVPN
Protocol: OpenVPN
Expiry/Bandwidth Limit: 30 days after trial activation
VPN Server Location: US
Restrictions: 200MB bandwidth daily, hourly disconnection
Website: http://tsunamifree.blogspot.co.uk


Mullvad
Protocol: OpenVPN
Expiry/Bandwidth Limit: 3 hours after installation
VPN Server Location: Netherlands, Sweden
Restrictions: NONE
Website: https://mullvad.net/en/


Kebrum
Protocol: OpenVPN
Expiry/Bandwidth Limit: NONE
VPN Server Location: Germany
Restrictions: Only port 80 and 443 is allowed.
Website : https://kebrum.com/en/


PRIVATE WiFi
Protocol: OpenVPN
Expiry/Bandwidth Limit: 3 days after account creation
VPN Server Location: US, UK, Netherlands, Singapore
Restrictions: NONE
Website: http://www.privatewifi.com/


Spotflux
Protocol: OpenVPN
Expiry/Bandwidth Limit: NONE
VPN Server Location: US
Restrictions: Software runs on Java
Website: http://www.spotflux.com

TorVPN
Protocol: OpenVPN
Expiry/Bandwidth Limit: 1GB per month with NO EXPIRY
VPN Server Location: Hungary
Restrictions: Account auto deactivated if idle for 7 days
Website: http://torvpn.com/information.html

proXPN
Protocol: OpenVPN
Expiry/Bandwidth Limit: NONE
VPN Server Location: US
Restrictions: Speed limited to 300Kbps and initially forwards you to upgrade your plan to premium then wait 10 seconds to get to your site.
Website: http://proxpn.com/


CyberGhost
Protocol: OpenVPN
Expiry/Bandwidth Limit: 1GB per month with NO EXPIRY
VPN Server Location: Germany
Restrictions: Involve a lot of steps in setting up which can be a bit confusing. Auto 6 hours disconnection and download speed limited to 2Mbps.
Website: http://cyberghostvpn.com/

Hotspot Shield Free
Protocol: L2TP
Expiry/Bandwidth Limit: NONE
VPN Server Location: US
Restrictions: Display advertisements on top of web browser
Webiste: http://www.hotspotshield.com/


SecurityKISS
Protocol: OpenVPN, PPTP, L2TP
Expiry/Bandwidth Limit: 300MB usage per day with NO EXPIRY
VPN Server Location: US, UK, France, Germany
Restrictions: Capped speed, no games, email clients, voip or video chats, and video/music streams.
Website: http://www.securitykiss.com/resources/download/windows/


CactusVPN
Protocol: OpenVPN, PPTP, L2TP, Proxy
Expiry/Bandwidth Limit: 24 hours after account creation
VPN Server Location: US, UK, Netherlands
Restrictions: None
Website: http://www.cactusvpn.com/

If we missed any VPN, Please comment with the VPN name and We'll update the list .


Tuesday, November 5, 2013

Install MySQL and PhpMyAdmin to Apache Web Server On Linux VPS

2:32 PM Unknown

Install MySQL and PhpMyAdmin to Apache Web Server on Linux VPS or any Linux Machine [Ubuntu]

PhpMyAdmin is a free and open source tool written in PHP intended to handle the administration of MySQL with the use of a web browser.To  manage mySQL hassle free from GUI Interface PhpMyAdmin is installed along mySQL.

Steps to Install MySql and PhpMyAdmin to VPS
  • Login to your VPS command line or Open terminal on your Ubuntu Machine. 
Terminal VPS
  • Type the following commands :
    • apt-get install mysql-server
      • Now terminal will open a "Package Configuration Wizard". 
      • Setup the password for the mysql user.
    • apt-get install libapache2-mod-auth-mysql php5-mysql phpmyadmin
      • Now again a "Package Configuration Wizard" will open.
      •  Choose "Apache2" and press YES when asked for "Configuring PhpMyAdmin". 
      •  Enter password for the PhpMyAdmin user and make sure that password of MySQL and PhpMyAdmin are same.
Configure PhpMyAdmin Wizard
  • Now move PhpMyAdmin to directory accessible on Web i.e [ /var/www ].
    • ln -s /usr/share/phpmyadmin /var/www/phpmyadmin
  • Now restart Apache Web Server and open PhpMyAdmin Panel.
    • restart apache2
    • Open your site [ Vps Ip/phpMyAdmin ] e.g [ http://192.168.0.1/phpMyAdmin ]
PhpMyAdmin Web Interface
  • MySQL and PhpMyAdmin are successfully installed on your VPS or Machine.


Saturday, October 26, 2013

Use Linux VPS as Proxy Server

8:14 PM Unknown

Use Linux VPS as Proxy Server | Run Proxy Server on VPS | Use Ubuntu as Proxy Server 

Many times we need a proxy server [ IP : Port ] to bypass censorship and other things. So, here is an simple solution to use a Linux VPS as proxy server or your Ubuntu machine as proxy server.
  • We are going to use SQUID to run Proxy server on our VPS or Linux machine. To install Squid on your machine run the following command .
    • apt-get install squid3
  • By default Squid dosen't allow incoming connections from outside of the network. So, we are required to configure Squid.conf file located at [ /etc/squid3 ] to make squid accept external connections.
  • We will discuss how to configure Squid for more functionalities  in later tutorials. Till then you can use a pre-editied file to allow squid to accept external traffic.
  • Download File from here: https://www.dropbox.com/s/52jm0fq90g1ioke/squid.conf
  • Now replace the file with squid.conf file loacted at [ /etc/squid3 ] using SFTP [ Use BitVise SSH client ].
  • Configure your browser to use your VPS, Ubuntu Machine's IP [ To get IP, type ifconfig in terminal ] address as proxy and 3128 as Port. [ 3128 default service port of Squid ].
  • To Start, Stop squid use the following commands.
    • service squid3 start [ To Start Squid]
    • service squid3 restart [ To Restart Squid]
    • service squid3 stop [ To Stop Squid]


Friday, October 25, 2013

Host Website On Linux VPS or Linux Machine

9:30 PM Unknown

Host Website on Linux Based VPS | Install APACHE Webserver on Linux

Website hosting is a general application of VPS as they provide higher bandwidth and traffic management. So, here is a few setp tutorial to host your website on VPS or your Home linux server or PC.
  • Connect to command line as root. [ If don't know how to operate a VPS, check this http://www.help2cse.com/2013/09/how-to-use-linux-based-vps.html ]
  • To run a website on VPS, we need a Webserver isntalled on VPS. So, we are using APACHE Web-server on Linux to host the Website.
  • Run the following command to install APACHE .
    • apt-get install apache2
  • After installation of Apache, type your VPS IP in web-browser to check whether confirmation page opens or not. It will show something like this.
  • Now if you see "It Works" Page, It means Apache has been successfully installed and running.
  • Now go to [ /var/www ] directory on VPS using command line [ cd /var/www ] or using SFTP and upload your website files .
  • Important commands related to APACHE
    • service apache2 start [ To start apache server ]
    • service apache2 restart [ To restart apache server ]
    • service apache2 stop [ To stop apache server ]


Friday, October 18, 2013

Configure Linux based VPS from Android Mobile

8:45 AM Unknown


Configure Linux Based VPS or Telnet Using your Android Mobile

Most of the times while travelling we don't have access to our laptop or regular SSH/ Telnet Clients ( #Bitvise SSH Client, #Putty ) and if we got some urgent work with telnet or VPS we struck. So here ia an alternate solution to handle SSH/ Telnet tasks from Mobile.


Configure VPS using Mobile
  • After Installing Application
    • Enter USERNAME and PASSWORD for the VPS. [ If you don't know the username , its root by default if not changed ].
    • Enter the HOST IP of VPS and Port [ deafult port is 22 ].
    • Now Connect :)
  • Now you have the command line access to your VPS.


Wednesday, October 2, 2013

Change password on Linux Based VPS

10:24 AM Unknown


Change password of Linux based VPS using command line.


As the default password provided by the VPS seller are large alphanumeric and random, and for people using VPS frequently it become a hassle to remember the large random password. Apart from the above their a number of reasons people need to change password of their VPS.


Change Password of Linux Based VPS using Command line [ Ubuntu, CentOS, Fedora etc]

VPS Command Line
  • Now type the following command to change the password.
    •  passwd root
      • root is the username , if you have any other username, you need to type that.
  • Now enter the new password twice.
Change VPS Password | Command line


Tuesday, October 1, 2013

Install Remote Desktop RDP on Ubuntu VPS

9:29 PM Unknown


Install [RDP] Remote Desktop GUI on Ubuntu VPS. 

As most of the VPS comes with pre-installed command line image of OS. I.e their is no GUI interface for the VPS , and you are left with command line interface to manage the VPS. 

So, if you are not familier with commands or command line interface you can make your VPS run GUI version of the OS installed. I.e you van make your VPS a remote desktop.

Steps to setup Remote Desktop on Ubuntu based VPS.


  • Now run the following commands one by one to install rdp on VPS.
  1. apt-get update
  2. apt-get upgrade
  3. apt-get install ubuntu-desktop
  4. dpkg-reconfigure xserver-xorg
    • If on running this command, you get an error like this 
      • dpkg-query: package 'xerver-xorg' is not installed and no information is availab
      • le
      • Use dpkg --info (= dpkg-deb --info) to examine archive files,
      • and dpkg --contents (= dpkg-deb --contents) to list their contents.
      • /usr/sbin/dpkg-reconfigure: xerver-xorg is not installed
    • Run the following command
      • apt-get install xserver-xorg
  5. apt-get install tightvncserver
After successful execution of the following commands your VPS is now ready to run GUI.
  • Now run these commands to setup GUI.

  1. vncserver :1 -geometry 1024x768 -depth 16 -pixelformat rgb565
    • To start VNC Server with the following configuration.
    • As soon you enter this command it will ask for a password [ max 6 digit], enter password of your choice, and this password will going to be used during making connection to RDP.
  • As the default VNC server doesn’t use Gnome window manager as default, to run Gnome as default we must do some changes on the configuration file. To do so, either edit the xtartup file manually or upload the one already modified.
    • To edit manually type "vi ~/.vnc/xstartup" and change the content similar to the given file, Save and restart Vps.
      • #!/bin/sh
      • xrdb $HOME/.Xresources
      • xsetroot -solid grey
      • x-terminal-emulator -geometry 80x24+10+10 -ls -title "$VNCDESKTOP Desktop" &
      • #x-window-manager &
      • gnome-session &
    • Or simply upload the already modified file using SFTP to [./vnc folder] [SFTP conenction is only available in #BitVise SSH Client] [ Download Modified File ].

  • Now enter "restart" to restart vps and restart type "vncserver :1 -geometry 1024x768 -depth 16 -pixelformat rgb565" to start VNC.
  • Now download #Tight VNC Client [ Download ] and install.
  • Now open Tight Vnc Client and put your remote host as VPS-IP:1 [Suppose your vps IP is 192.168.6.7 . SO you need to enter 192.168.6.7:1 in Remote Host and press connect.

  • Now enter the password you entered earlier during the setup and your VPS is now ready with Graphical Interface.

  • Now you can manage your VPS using Graphical interface.


Sunday, September 29, 2013

How to Use a Linux Based VPS

10:48 PM Unknown

How to use a Linux based VPS

First of all before be began any thing let;s learn a bit about VPS. VPS stands for Virtual Private Server which is basically a server or a computer like the one you have with higher RAM, HDD, better processor, secure and with high speed connectivity over Internet.

  • As VPS provides higher processing capability , high level of control, and a lot more features. Their may be a number of reasons for purchasing a VPS. 
  • Linux VPS always comes with an preinstalled image of some LINUX based OS like Ubuntu, CentOS, Fedora etc. But, the method of using them dosen't change depending on the image, What change is the commands that will matter later.
  So, now assuming you finally have a Linux VPS.  i.e an IP (something like 192.168.0.1 ) and a username and password and you don't know what to do with them.

Steps to use a VPS

  • To make a connection to terminal (VPS) first you need a SSH client. Their are a no of such clients available over internet Free and Paid both, and you are free to choose any of them. 
  • For now we are going with #Bitvise SSH Client ( Download ). You can also try #Putty
  • Enter your VPS IP in the HOST and put port as 22 and change the username to the one provided by your VPS provider. For most vps sellers its root.
  • Now click LOGIN.
  • Now it will ask you for the password. Enter the password and Volla You got connected to VPS and you have the terminal Window to use vps.

  • Don't worry basically Linux vps comes with command line image of Operating System but, if you want to use your VPS as RDP( Remote Desktop) or as GUI , you can do so later using command line. 
  • To Browse files on your VPS you can use SFTP client that was provided along with SSH BitVise Client.
Download Bitvise SSH Client From Here