Setting Up your Own DNS Tunneling Server and Tunnel Network over DNS using our own created server . As the method is quite long have patience and follow the steps carefully or Alternatively, you can use an easier approach using Your-Freedom Client.
 |
| Create your own DNS Tunneling Server |
Requirements
- A VPS [ Virtual Private Server ] with tun/tap support.
- Free time and Lot of patience.
Settings up DNS to resolve Queries
- Register a free account at freedns.org , and Verify your account.Now , Login to the account and go to Sub-Domains.
- Under Sub-Domains click on ADD and Fill the required details .
- Select TYPE as NS.
- For Sub-domain field enter any name[ eg. iterative].
- Select any Domain from available list for domain field.
- Similarly for Destination, enter any name and append your domain with it. [ Suppose your sub-domain-name is iterative and domain is mooo.com, then enter iterative.mooo.com as Destination.] and Save.
 |
| Setting up DNS Server |
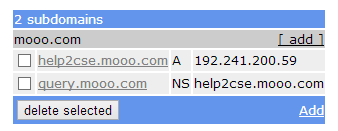
- Add another record for sub-domain with the following details .
- Select TYPE as A.
- Enter your Sub-Domain, in the Sub-Domain field .[ eg iterative for example, defined earlier ].
- Select older Domain for the Domain field [ mooo.com in our case ].
- Now in Destination, Enter your VPS IP and Save.
 |
| Setting up DNS, Type A |
- Now our DNS setup is ready to resolve queries.
 |
| DNS records Configured |
Server Setup [ Ubuntu ]
To setup our Tunneling server we are going to use Iodine Daemon , and before proceeding make sure you are login as root user and VPS have tun/tap capabilities.
- Login to Terminal of your VPS. If you don't know how to Login to Terminal, Read your guide on using Linux VPS.
- Now type the following command to install iodine on your VPS.
- apt-get install iodine [ For Debian and Ubuntu users ].
- yum install iodine [ For CentOS users ].
After executing the following commands Iodine got installed on your VPS. Now we need to start iodine so that it start listening for incoming connections. By default Iodine listens on Port 53 [DNS].
- Now type the following command to start Iodine "iodined -f Privae IP -P Password subdomain.domain". I.e for our case query will be [ iodined -f 10.0.0.1 -P iterative query.moo.com ]
- Append -f to run the service in Fore-ground. If -f is not included Iodine will get terminated as soon you close terminal.
- Always use private IP stack for the server . [ Eg : We have selected 10.0.0.1 , You can also use 198.168.0.0 , 172.0.0.1 etc ]
- iterative is the password for our case. You can use your own password.
- query.moo.com is our domain name. Check III snapshot in DNS setup corner.
 |
| Iodine Started on Server |
- Now your VPS is ready to listen and We will now proceed to setting up Iodine client on windows.
Check Your Server Setup
Vists http://code.kryo.se/iodine/check-it/ and enter your Domain name [ query.mooo.com in our case ] to check the Iodine configuration . The site will check and return whether your server is properly configured or not.
 |
| Iodine Configuration Successful |
Setting Up Client to use DNS Tunneling.
- Download and Extract Iodine from http://code.kryo.se/iodine/ to C Drive [Win 32 Libraries].
- Now open CMD and go to Directory where you had extracted the Iodine. [ cd C:\iodine\bin ]
- Now run the following command to start Iodine [ iodine -f -P iterative query.mooo.com ].
 |
| Iodine Client Running |
Frequent Problems.
- Make sure Tap adapter is installed on your system . If not visit openvpn downloads and install TAP adapter.
- If more than 1 adapters are installed on your system. Append -d "adapter name" to the string while starting iodine. [ iodine -d "Local Area Connection 2" -f -P iterative query.mooo.com ] . Here, Local Area Connection 2 is adapter name.
- To check available adapters on the system Type ncpa.cpl on run.
Still Facing Problems.
If you still facing any problem while setting up server and connecting to server. Leave a comment with the problem description and we will try to solve it as soon as possible.


